Introduction
MxMC can be remote-controlled from other programs using HTTP request. The remote control function allows the manipulation of multiple instances of MxMC, (i.e. the ability to manage a monitor wall). It is also possible to use these command to automate various tasks, such as exporting recordings. The commands can be either put into a web browser, soft button, or IP Notify Profile.
In the follow steps the way will be shown How to export the recordings via the MxMC Remote Control by configuring Camera IP-Notify and Time Task profile.
Enabling MxMC Remote Control
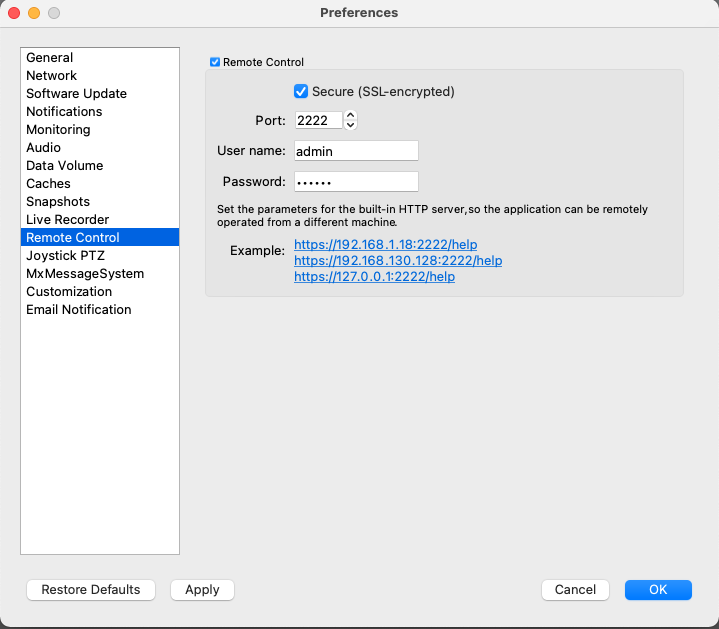
This feature is activated under >File >preferences > Remote Control

Once the Remote Control is activated it is possible to access a list of available commands via http://pc_IP:port/help

IP Notify to Show a Specific Camera in the Focus Window:
Create an IP Notify Profile as below:
IP Notify Type: Custom Configuration
Destination Address: <pc_ip_address>:<port_set_in_mxmc_remote_control>
Data Protocol: HTTP/1.0 Request
CGI-Path: /show
HTTP Authentication: username:password
Data Type: Plaintext
Message: ip=<camera_ip>
IP Notify to Show a Group in the Grid View:
Create an IP Notify Profile as below:
IP Notify Type: Custom Configuration
Destination Address: <pc_ip_address>:<port_set_in_mxmc_remote_control>
Data Protocol: HTTP/1.0 Request
CGI-Path: /show
HTTP Authentication: username:password
Data Type: Plaintext
Message: group=&grid
Automating a Daily Export of a specific Time Period.
This uses the cameras IP Notify and Time Task to automatically export a clip from set time every day.
The steps necessary configure this are:
Create the Export Profile (only needs to be done once)
Create an IP Notify profile to add the desired time range to the export list
Create an IP Notify profile to export the export list
Create an IP Notify profile to clear the export list
Create Time Tasks to execute the IP Notify profiles
Create the Export Profile
This step only needs to be accomplished once to and is best done with a web browser.
The command needed from the list of available commands:
exports?create&profile=Test&format=AVI&framerate=25&resolution=1024×768&audio[=on/off]&ptz[=on/off]&separate[=on/off]&max=1024
The command:
http://admin:123456789@<pc_ip_address>:<port_for_mxmc_remote_control>/exports?create&profile=Test&format=AVI&framerate=25&resolution=1024x768&audio=on&ptz=on&separate=on&max=1024
Create an IP Notify profile to add the desired time range to the export list:
The command needed from the list of available commands:
exports?add&camera=&begin=2016-06-01+12:00:00&end=2016-06-01+12:10&audio[=on/off]&ptz[=on/off]
The command:
Note the addition of the $(TMS.DATE) variable to insert the current date in the correct format.
http://username:password@<pc_ip_address>:<port_for_mxmc_remote_control>/exports?add&camera=172.22.0.126&begin=$(TMS.DATE)+16:00:00&end=$(TMS.DATE)+16:15:00&audio=on&ptz=on
How to configure the IP Notify:
Profile name: add range to export list
IP Notify Type: Custom Configuration
Destination Address: <pc_ip_address>:<port_for_mxmc_remote_control>
Data Protocol: HTTP/1.0 Request
CGI-Path: /exports
HTTP Authentication: username:password
Data Type: Plaintext
Message: add&camera=172.22.0.126&begin=$(TMS.DATE)+16:00:00&end=$(TMS.DATE)+16:15:00&audio=on&ptz=on
Create an IP Notify profile to export the export list
The command needed from the list of available commands:
exports?export&profile=&path=file:///pathtoexportfolder
The command:
http://username:password@<pc_ip_address>:<port_for_mxmc_remote_control>/exports?export&profile=Test&path=c:\Users\mgo\Desktop\test1
How to configure the IP Notify:
Profile name: export export list
IP Notify Type: Custom Configuration
Destination Address: <pc_ip_address>:<port_for_mxmc_remote_control>
Data Protocol: HTTP/1.0 Request
CGI-Path: /exports
HTTP Authentication: username:password
Data Type: Plaintext
Message: export&profile=Test&path=c:\Users\username\Desktop\foldername
Create an IP Notify profile to clear the export list
The command needed from the list of available commands:
exports?clear
The command:
http://username:password@<pc_ip_address>:<port_for_mxmc_remote_control>/exports?clear
How to configure the IP Notify:
IP Notify Type: Custom Configuration
Destination Address: <pc_ip_address>:<port_for_mxmc_remote_control>
Data Protocol: HTTP/1.0 Request
CGI-Path: /exports
HTTP Authentication: username:password
Data Type: Plaintext
Message: clear
Create Time Tasks to execute the IP Notify profiles
This task can be run at any time before 24:00, if it is run after 24:00 the $(TMS.DATE) variable will insert the date for the next day when there is likely no data available.
Note that the “add range to export list” profile and “export export list” profile can be initiated with a short time in between but, make sure that there is enough time for the export to finish before initiating the “clear export list” profile.
For this example between 22:00 and 22:30.

Minutes 	Hours 	Days of Month 	Months 	Week Days
Add range to export list 1 22 * * *
Export export list 2 22 * * *
Profile name: clear export list 30 22 * * *