Introduction
Although there is no limitation in the number of SIP clients that can be registered to the camera’s internal SIP Server, sometimes it can be necessary to register all the VoIP devices (door stations included) to an external SIP Server. This is the case when you have an hybrid system which comprises not only VoIP phones but also analog/ISDN phones. The internal SIP Client of the MOBOTIX cameras can be registered to an external SIP Server rather than to the internal one.
Corporate PBX Supporting Video Calls

In this scenario we have one or more Door Stations and several IP phones registered as SIP clients to the corporate PBX. The same PBX allows also connecting standard analog and ISDN phones. Moreover the PBX is connected to the PSTN/WAN network; this allows the extensions to call phone numbers outside of the company.
In the following examples we will show how to configure two different systems i.e. an Asterisk based PBX and a Cisco Unified Communications Manager.
Please note that both the aforementioned systems support video codecs such as H.264 and/or H.263+.
The configuration of the call features of the SIP Server is beyond the scope of this tutorial. We will only show you how to create the SIP accounts so that the SIP clients can register to the server and call each other.
Multiple Door Stations can be connected to the same scenario; the SIP configuration will be the same for all the Door Stations except for the VoIP account (i.e. / ).
Cisco Unified Communications Manager
Configuring the Call Manager (tested version 8.6.2)
IMPORTANT: This article is intended for expert users only. Do to the high complexity level, the configuration of the CUCM should be carried out by certified Cisco partners with CCNP Voice certification. MOBOTIX declines any responsibility for any damage deriving from the misuse of the following information.
NOTE: The example below used CUCM version 8.6.2 (default configuration) installed on a VM virtual machine. The configuration of Cisco IP Phones as well as the configuration of the advanced call features of the CUCM is beyond the scope of this guide.
The CUCM configuration can be done entirely from the Web GUI. Open a Web browser and type the IP address of the CUCM. Click on the link “Cisco Unified Communications Manager” to access the authentication page.

In the top-right corner of the page there is a drop-down menu with 5 different options. Each option gives you access to different configuration sections.

Cisco Unified Serviceability
- Select “Cisco Unified Serviceability” from the drop-down menu and click on “Go”. The page will reload. Type the administrator user name and password in the fields and click on “Login”.

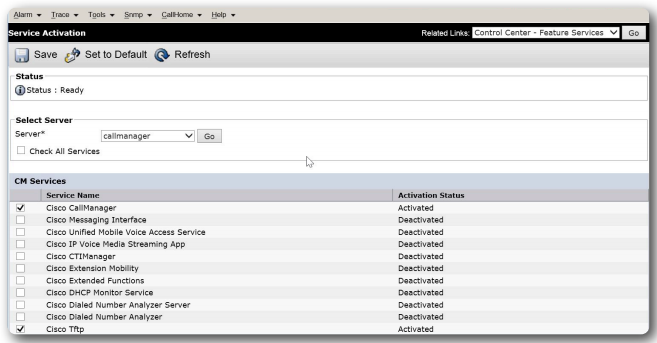
- Click on Tools > Service Activation to display the list of available services.

-
Select the server you want to configure from the drop-down menu. In this example we only have one server (callmanager) in the cluster.
-
Make sure that the services “Cisco CallManager” and “CiscoTftp” have been activated. If this is not the case please check them and press “Save”
-
The “Call Manager” service allows you to establish calls whereas the “Cisco TFTP” service allows the Cisco phones to download a configuration file from the server.
Cisco Unified CM Administration
- Select “Cisco Unified CM Administration” from the drop-down menu in the top-right corner of the page and press “Go”. The page will reload. Type the administrator user name and password in the fields and click on “Login”.

- Now we need to create a “Device Pool” which is a group of devices that share the same characteristics. The most important characteristics of a Device Pool are as follows:
-
Cisco Unified CM Group: CUCM allows creating a cluster of servers for redundancy. The CM Group is the list of servers (up to 3) to which the phones are allowed to register.
-
Date/Time Group: here we can define the time settings for the phones.
-
Region: these settings allow you to define the bandwidth for the calls. This is useful especially when the phones are located in different areas connected through a low bandwidth Internet connections. In this case you can force the endpoints to negotiate low bandwidth codecs (e.g. G.729 or iLBC) if the call needs to transit through the WAN and uncompressed codecs (e.g. G.711 or G.722) if the call stays within the LAN.
NOTE: It’s important that all the IP phones that are supposed to make/receive calls to/from the Door Station belong to a Device Pool allowing for uncompressed codecs like G.711 and G.722.
In this article we will assume that the “Cisco Unified CM Group” and the “Date/Time Group” have been
already properly configured. We will verify that the “Region” we want to assign the Door Station and the
phones to allows those devices to have a sufficient bandwidth to transport voice and video data.
- Click on System > Region. An empty list will be displayed. Click on “Find” to obtain the complete list of “Regions” already configured. Since the CUCM is at factory default only one Region will appear (i.e. Default). Now we can click on the “Add New” button to add a new Region or we can click on a Region in the list to edit it. We will now edit the Default Region by clicking on it.
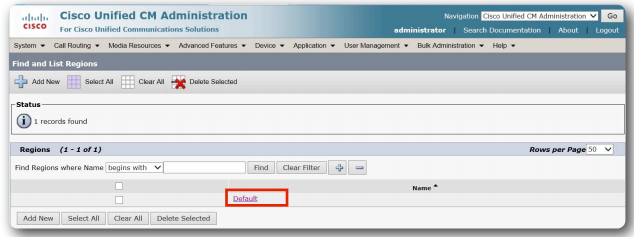
- Click on the Region’s name in the “Regions” text box. Select “64 kbps (G.722, G.711)” from the “Max Audio Bit Rate” drop-down menu and set at least 500 kbps (2000 kbps recommended) as “Max Video Call Bit Rate”. Click on “Save” to store the changes and “Apply Config” to apply them. Click on “Reset” to reload the configuration on the phones.

- Now we need to create a user for the Door Station. Click on User Management > End Users and click on “Add New”

- Set the new user as shown in the following picture. Here is the list of the essential parameters you need to keep into consideration:

- Now we are required to create a new “Phone” device. Such entity will be univocally associated to the MAC address of the device we are about to register as a VoIP Client, in this case the MOBOTIX Door Station. The basic characteristics of the “Phones” are inherited from the “Device Pool” configured at step #4.
- Click on Device > Phones and click on “Add New” to create a new profile.

-
Select ”Third Party SIP device (Advanced)” from the drop-down menu. The “Advanced” option has a cost of 6 DLU’s and allows for video calls and multiple accounts. Click on “Next” to continue.
-
Fill out the fields of the following page as shown in the picture. In the grey box the essential parameters you need to keep into consideration. When done press “Save” to store the changes and “Apply Config” to apply them.

NOTE: The “Digest User” is the logical link between the entities “Phone” and “End User”.
- Now that we have a “Phone” device we need to assign it an extension number which, in CUCM world, is called “DN - Device Number”. From the list of the configured “Phone” profiles click on the MAC address corresponding to the MOBOTIX Door Station to edit the profile settings. A new page will open showing the characteristics setup in step #9. On the left-hand side the list of the lines (Device Numbers) is displayed. Click on “Line [1] - Add a new DN”.

Type the extension number you want to assign to the Door Station (e.g. 6000 and press “Save” to store the changes.

Configuring the MOBOTIX Door Station
The last step is to setup the camera to register to the CUCM with the account configured in the step above.
- Admin Menu >> SIP Client Settings.

- If you carried out the auto-configuration process on the camera, in the SIP Client Settings page you should findn an existing account (*201).
-
2a. You can delete it by pressing the “Delete” button on the right-hand side of the page.
-
2b. Press the “Add new SIP account” button
-
2c. Fill the fields with the values setup during configuration of the “Phone” entity on the CUCM. “Domain” and “Hostname/Address” are the IPaddress of the CUCM server. User name and password are, in this example, “MOBOTIX_T25” and “12345”. The SIP port is, by default, 5060.
Remember to check the options “Available as Proxy” and “Use as Registrar”. Press “Set” to apply the changes. Press “Set” to apply the changes and “Store” to save the configuration in the Flash memory.

NOTE: When the “Parallel Dialing” option is enabled in the SIP Client Settings the camera sends multiple invite packets from multiple source ports (i.e. 5070, 5080 and so on) to reach each extension. The parallel dialing might be blocked by some PBX’s because of security reasons. If you want to call multiple extensions simultaneously please disable the Parallel Dialing option and create a hunt group on the PBX with the extensions you want to call. For further information on calling multiple extensions simultaneously pleasue refer to the relavanet section in the “Registering a MOBOTIX Camera to a Corporate PBX Supporting Video Calls (Asterix Based)” article
If everything has been done correctly you can refresh the page “Device > Phone” of the CUCM to display the registration status of the MOBOTIX Door Station.
