Milestone Watermark for the MOBOTIX HUB Desk Client
Embedding digital watermarks in the video image to protect the video material from manipulation and unauthorised distribution
General description
Introduction
The Milestone Smart Client Watermark is a plug-in, which supports several features including:
- Configuring one or multiple images, text and additional text for it/them in the MOBOTIX HUB Management Client and displaying it/them in an MOBOTIX HUBDesk Client view
- Exporting audio and video from the MOBOTIX HUB Desk Client in MOBOTIX HUB format and Media player format which contains the images, the text and the additional text in case they exist in the recordings
- Restrict the use of plugin based on the MOBOTIX HUB roles
Solution overview
The solution consists of:
- MOBOTIX HUB Management Client plug-in where the configuration of the images, the text and the additional text is done, including different settings described in chapter MOBOTIX HUB Management Client configuration
- MOBOTIX HUB Desk Client plug-in where the configured images, the text and the additional text are displayed as overlay; Export functionality is also handled by this plug-in.
Installation
Prerequisites
The Milestone Smart Client Watermark plug-in is compatible with MOBOTIX HUB 2022 R1 or newer.
Plug-in installer
The Milestone Smart Client Watermark plug-in consists of one installation file supporting Windows 64-bit only:
- MilestoneSmartClientWatermark_2.0.XX.X.msi
The Milestone Smart Client Watermark plug-in must be installed on the following computers:
- On the computer where the MOBOTIX HUB Management Client is installed
- On each computer where the MOBOTIX HUB Desk Client is installed
Installation steps
- Start the installation by executing MilestoneSmartClientWatermark_2.0.XX.X.msi .
- Follow the Wizard until is done!
- Restart the MOBOTIX HUB Management Client and the MOBOTIX HUB Desk Client.

License
This solution includes a built-in MIP license check tied to the MOBOTIX HUB system’s Software License Code (SLC). It offers a 30-day grace period starting from the plug-in installation. After that, a permanent MIP license—provided by MOBOTIX—is required. To obtain it, the SLC must be sent to MOBOTIX sales/order (preferably via email). Once received, MOBOTIX HUB VMS must be reactivated (online or offline). If the license check fails, the plug-in will show errors and operate with limited functionality.

The status of the License can be also checked in the MOBOTIX HUB Management Client:

After that the Installation is done and you can start with the Configuration of the Watermark PlugIn.
MOBOTIX HUB Management Client configuration
Add hardware device
- Open MOBOTIX HUB Management Client > Site Navigation > Servers > Recording Servers.
- Right click on the current recording server and select Add Hardware…
- Follow the wizard to add all available hardware devices.
Note : For detailed description on how to add hardware devices to a recording server, see the MOBOTIX HUB (Management Client) help.
Example:

Related microphone
A microphone must be mapped to the camera if you need an audio to be recorded and exported.
- Open MOBOTIX HUB Management Client > Site Navigation > Servers > Recording Servers.
- Select the added hardware device and check if its microphone is enabled.
Example:

- Select a camera from the hardware device and navigate to Properties > Client tab.
Typically, the microphone of the hardware device is automatically added as Related microphone.
Another microphone can be added as Related microphone based on your requirements.
Note : For detailed description on how to add Related microphone to a camera, see the MOBOTIX HUB (Management Client) help.
Example:

Add role
- Open MOBOTIX HUB Management Client > Site Navigation > Security > Roles.
- Add roles based on your requirements.
Note : For detailed description on how to add roles, see the MOBOTIX HUB (Management Client) help.
Example:

MOBOTIX HUB Management Client Watermark configuration
- Open MOBOTIX HUB Management Client > Site Navigation > Client > Smart Client Watermark.

The following settings are available and can be configured:
Mode 1x1
- This option will display only one image in the MOBOTIX HUB Desk Client view.
Mode 3x3
This option can display up to 9 images in the MOBOTIX HUB Desk Client view. Each image is configured separately by following these steps:
- Click on a number from the box.
- Select the required settings.
- Click Save in the toolbar to save the settings.
Note : The settings are reset to default in case the mode is switched. The following confirmation message appears:

Image: Location
- Specifies the location of the image. The supported values are Top Left, Top Right, Center, Bottom Left, Bottom Right, None. The default value is Top Left.
Image: Opacity (%)
Specifies the opacity of the image in percentage. The supported values are from 1 to 100. The default value is 50.
Image: Scale Factor (%)
Specifies the scale factor of the image in percentage. The supported values are from 1 to 100. The default value is 50.
Image: Change button
Click this button to select an image. The recommended file formats are jpg, jpeg, png, bmp, gif. A preview of the image is displayed after it is selected in the box next to the Change button.

Note : The following error message is displayed in case the image is invalid:
Text: Location
Specifies the location of the text. The supported values are Top Left, Top Right, Center, Bottom Left, Bottom Right, Under Image, None. The default value is Top Left.
Text: Opacity (%)
Specifies the opacity of the text in percentage. The supported values are from 1 to 100. The default value is 50.
Text: Font Scale (%)
Specifies the font scale of the text in percentage i.e. percent of the height of the grid cell the text is located in. The supported values are from 1 to 100. The default value is 30.
** Text: Font Color**
Specifies the font color. The default font color is white.
Text: Text
Specifies the text which will be displayed, including following special symbols:
{0}: User
{1}: Computer name
{2}: New line
Note : “{“ and “}” symbols are not supported except for the described special symbols. The configuration will be reset to default if those are used.
The default value is {0}.
Additional Text
The same settings which are available for the Text, are available also for the Additional Text.
Note : Under Image value for the Location is not available.
Administrator role
Show Overlay for Administrator role Check this option to enable a user who is part of the MOBOTIX HUB Administrators role to see the image, the text and the additional text overlay in the MOBOTIX HUB Client view.
- Click Save in the toolbar to save the configuration. The changes are applied in the MOBOTIX HUB Desk Client usually in a matter of seconds.
Set permissions for a role
- Open MOBOTIX HUB Management Client > Site Navigation > Security > Roles.
- Select a role and navigate to the MIP tab in the Role Settings window.
- Click on the Milestone Smart Client Watermark.
- Select Hide Watermark to hide the configured watermark and Export with Watermark button (in the MOBOTIX HUB Desk Client > Playback tab) for the users which belong to that role.

Remove default Export functionality in the MOBOTIX HUB Desk Client
Note : This configuration is optional and must be done in case you want to remove the default Export function in the MOBOTIX HUB Desk Client, so users should use only the Export function of the Milestone Smart Client Watermark.
- Open MOBOTIX HUB Management Client > Site Navigation > Client > Desk Client Profiles.
- Select the Default Desk Client Profile or the profile which is currently used and navigate to the Export tab in the Desk
Client profile settings – Export window. - Select Unavailable option in the dropdown for the General > Export function.
- Click Save in the toolbar.
- Navigate to MOBOTIX HUB Management Client > Site Navigation > Security > Roles.
- Select the role based on your requirements and navigate to the Info tab in the Role Settings window.
-
- Select the correct Desk Client profile from the dropdown (if it is not already selected).

Example:

- Click Save in the toolbar.
Note : For detailed description on how to remove Export function , see the MOBOTIX HUB (Management Client) help.
MOBOTIX HUB Desk Client operation
Live/Playback
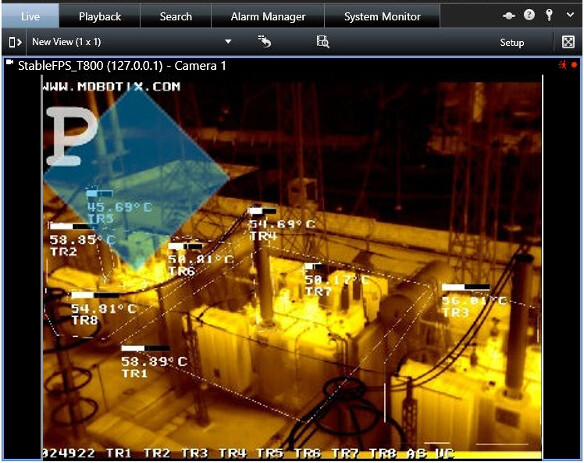
- Open MOBOTIX HUB Desk Client > Live tab.
- Create a view and add a camera.
- The image, the text and the additional text overlay are displayed in the MOBOTIX HUB Desk Client > Live or Playback view.
Note : For detailed description on how create a view and to add a camera, see the MOBOTIX HUB HUB (Desk Client) help.
Example:
Export audio and video
- Open MOBOTIX HUB Desk Client and navigate to the Playback tab.
- Select the camera just by selecting the view item.
Note : Selecting the camera by putting a checkmark in the right corner of the view item ( )
is not used in the Milestone Smart Client Watermark solution.
- In the timeline, click the Time Selection Mode button to select the start and end time of the sequence you want to export.
Note : One hour period starting from the current date and time (or the currently selected date and time) will be selected by default if no start and end time are selected from the Time Selection Mode .
- In the upper-right corner, click Export with Watermark.
Example:

The Export dialog window is displayed:

The following options are available and can be configured:
| Parameter | Description |
|---|---|
| Export name | The program automatically fills this in with the local date and time, but you can rename it. The folder inherits the export name. |
| Start time/End time | The selected time period is displayed here. |
| Item | Lists the cameras selected for export. You can delete an item from the Item list by clicking the red x next to it. |
| Add item… | Use this dropdown to select other cameras that you want to include in the list for exporting. Following options are available: |
| Selected camera: Adds the selected cameras from step 2. | |
| Current view: Add the cameras from the current view. | |
| Browse: All the cameras from the recording server are listed and can be selected. | |
| Use the Remove All button to clear the list in the Item window section. | |
| Export destination | You can specify a path yourself (the field may suggest a path for you). When you specify a path this way, the folders you specify do not have to be existing ones. If they do not already exist, they are created automatically. |
| MOBOTIX HUB format | Use the MOBOTIX HUB format and the MOBOTIX HUB Desk Client – Player will be included along with the export. If you choose this option, other media players will not work. |
| Include MOBOTIX HUB Desk Client – Player (checkbox): Select to include the MOBOTIX HUB Desk Client – Player application with the exported data. The MOBOTIX HUB format can only be viewed with the MOBOTIX HUB Desk Client – Player. It is selected by default and cannot be deselected. | |
| Password protected (checkbox): Select the strength of the encryption you want to apply to the exported data. When you click Start Export, the system asks you for a password that must contain at least eight characters. The following encryptions are supported: 56-bit DES, 128-bit AES, 192-bit AES, 256-bit AES. | |
| Prevent re-export (checkbox): When selected the user opening the MOBOTIX HUB Format exported file via Desk Client Player, they will not be able to re-export the same file. The export option will be hidden and disabled in this case. - Leaving the checkbox empty removes the re-export restriction. | |
| Media player format | Use a format that most media players can play. This requires that a media player to be installed on the computer that will play the video. |
| Select content: Two options are available - Audio or video and Video only. | |
| Codec: All codecs which are currently installed on the computer, are listed and can be selected. Usually, Intel IYUV codec and Microsoft Video 1 encoding codecs are shipped together with the Microsoft Windows Operating System. | |
| Note: Intel IYUV codec can export videos with resolution up to 2048 x 1036. | |
| Xvid MPEG-4 Codec is recommended for use as it offers better compression. Intel IYUV and Microsoft Video 1 codecs are not recommended as its use results in larger export file size. | |
| You can download Xvid MPEG-4 Codec from https://www.xvid.com/download/ The export is split to several files if the overall size exceeds 512 MB.The naming convention is:1 file - .avi2 file - _0002.avi..N file – _n.avi |
Example:

- Click Start Export to export your video (and audio). In the upper-right corner, a progress bar is displayed showing the progress of the export if it is started successfully.

Click Cancel button in case you want to stop the export.
Execute the following actions if that error message is displayed:

View exported audio and video
The exports you create in MOBOTIX HUB Desk Client are stored in a default folder on your local computer unless you have specified a different folder. You can view an export immediately after creating it, or later.
To view the exported video immediately after creating it:
- Click the Export details link in the upper right corner when the export is complete.
Example:

The Export details dialog box appears with a link to the output folder.
Examples:
MOBOTIX HUB format:

Media player format:

- Click Show details to show detailed information about the export:
Examples:
MOBOTIX HUB format:

Media player format:

- Click the Export location link to open the output folder. Depending on the output format, do the following action:
| Format | Action |
|---|---|
| Media player format | Open the Media player format folder. The AVI file(s) can be opened with video/audio player. |
| MOBOTIX HUB format | Open DeskClient-Player.exe. |
Troubleshooting
This section provides information, which helps the administrator solve cases where the solution fails working.
New logging has been implemented and can be found in the default location
C:\ProgramData\Milestone\Milestone Smart Client Watermark.
Case: The following text (with red color) is displayed as overlay in the MOBOTIX HUB Desk Client view:
Your license has expired. Please renew your license.
| Cause | Action |
|---|---|
| MIP License has expired or is not activated. | In case of trial license: the MOBOTIX HUB Management Client must be restarted after the plugin installation in order the trial license to be generated. |
Case: The plug-in is not visible in the MOBOTIX HUB Management Client > Site Navigation > Client.
| Cause | Action |
|---|---|
| The plug-in is not loaded properly. | Verify that the plugin has been installed correctly. It should be typically located in: |
C:\Program Files\MOBOTIX HUB\MIPPlugins\MilestoneSmartClientWatermark|
Limitations
- Intel IYUV codec can export videos with resolution up to 2048 x 1036.
- When specifying export location take in mind that additional folders for the MOBOTIX HUB and Media Player format exported files will be created. This may result in the file path length being more than 256 characters long, which is invalid in Windows and a known limitation.
Known issues
There are no known issues at the time of the release.