Introduction
This article is intended for MOBOTIX CLOUD VMS administrators that are responsible for the initial setup and configuration of the VMS espicially for those who want to better understand the details relating to what defaults and why and how to make adjustments if needed.
MOBOTIX CLOUD VMS accounts always start with default settings. These defaults exist to save you time and are settings that often work best for the majority of users. The goal of these defaults is to most efficiently manage and configure users and cameras in a direct way. These Account Defaults help guide the administrator through the process and ensure that you get up and running as quickly as possible.
Functions
Account Creation
Account creation begins from the Reseller Dashboard. Creating a new account is achieved by
selecting the orange “+” icon from the top right corner of the Accounts page. Alternatively, you can
also click on the blue “+ Add Account” button from the bottom right corner of the Accounts page:
![]()
![]()
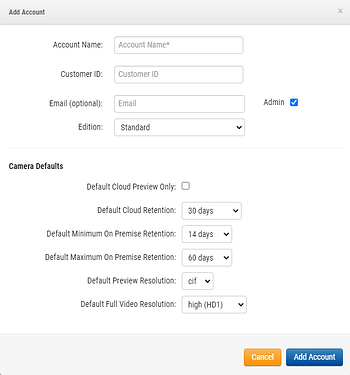
Both options display a pop-up menu that allows you to begin the process of creating an account:
The only required information to create an account is the Account Name.
With a name added, you can click the Add Account button and the new account will appear alphabetically on the Account page in the reseller dashboard.

Camera Defaults
The Camera Defaults that are set for the new account will configure the default subscription settings for all attached cameras unless otherwise changed. The Default settings for the Camera Defaults are as follows;
- Default Cloud Retention: 30 Days
- This setting indicates that the camera will send its h.264 stream to the cloud for 30 days of event recording. Settings default to “record on event” which means that a recording will begin when motion is detected and those event recordings will be retained for 30 days
- Options for this setting are as follows; None, 7 Days, 14 Days, 30 Days, 60 Days, 90 Days, 180 Days, 1 Year, and 2 Years.
- Default Preview Resolution: cif (320x240)
- This is generally a resolution of 320x240 (but this is dependent on the camera)
- cif stands for ‘common intermediate format’ or ‘common interchange format
- Options for this setting are as follows; cif or std
- std is generally a resolution of 640x480 depending on the camera
- Default Full Video Resolution: high (HD1)
- This setting indicates that the camera’s h.264 stream will be set at “high (HD1)” for event recording (HD1 is a subscription setting). High resolution is generally 1080x720.
- Options for this setting are as follows; std (SD1), high (HD1), 1080p (HD2), 3MP (HD3), 4MP (HD4), 5MP (HD5), and 10MP (HD10).
These defaults can be adjusted in both the Reseller Account and the End User Account:
Master Account > Account Settings > Defaults
Sub Account > Account Settings > Defaults
If you have forgotten to change the settings when creating an account or need to add in a batch of additional cameras and change the defaults, they can be adjusted from the Sub Account within Account Settings.
Application
These Account Defaults can drastically increase the speed of the End User Account Creation process. Especially in the instance that the End User Account has a majority of Cameras that will utilize the same Account Settings. When most or all of the cameras that will be deployed on an account have the same subscription or recording settings, then the Account Defaults allow you to add the cameras to the account without the need for any other adjustments in regard to the camera subscription settings.
The Account Defaults act as a tool for the account creator and therefore it can be a great
practice for establish the MOBOTIX CLOUD VMS by admins.
Another Account Default setting that needs to be adjusted for each End User account is the “Access” tab of the Account Settings from the Reseller Dashboard, found under the Actions section:

These defaults, if left unchanged, can create an account that does not allow for the proper servicing of
the account by the Reseller and potentially opens up the account to End User settings that can
override the intentions of the account by the reseller. Selecting the Access Settings checkboxes will result in specific changes to the overall behavior of the End User account and each account the
Reseller creates needs to be adjusted correctly to avoid potential issues in the future. A detailed
description of each check box is available by selecting the Help Guide option in the top right corner
(The “?” icon) of the window.
Notes
Accounts will require further adjustments to foster a smooth and successful setup and transition to
Video Surveillance through the MOBOTIX CLOUD VMS. By default, each VMS account will need Layouts, Users, Advanced Camera Settings (like motion-sensing zones), and Access settings adjusted.
Bandwidth Adjustments are likely to be needed as well and more information can be found within the article which handles bandwidth optimization. By default, all attached Bridges to an account will try
to utilize 50% of the detected bandwidth to transmit to the cloud at all times as can be seen in the screenshot below.
In a low bandwidth environment, this may not be desired. Another example of when leaving the
Default Transmit Bandwidth setting to 50% might not be the preferred is when off-hour transmission
of data to the cloud is needed.
Any time a change is made to the Default Settings, the window will update to display a “Restore to
Default” option, indicated by a “⟲” symbol as seen below. Selecting this symbol reverts the setting back to its original state.


